
This was my second main 3D modeling, unwrapping and "texturing" project even though technically the effects of glass can be made in game engines such as Unity with materials sliders rather than texture maps. This was the image reference I used for this model:

Session 1 - Modelling
For the process of modeling the glass, I followed this tutorial which teaches all about using splines (bezier curves) and modifiers to create an accurate base without needing to scale, extrude, repeat cylinders whilst getting undesired results from Subdividing.
I continued following the tutorial until he reached a point where he began talking about V- Ray and how he uses that render to get realistic glass which wouldn't have helped to see as I don't have that plugin/extension.
Session 2 - Optimisation
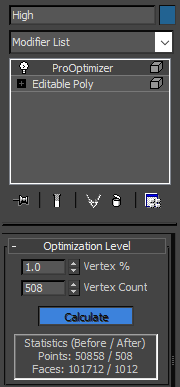
When Finishing the model, I noticed that because the tutorial uses a lot of smoothing iterations, I now had a very high polygon model that wouldn't be suitable for a game simply because it wasn't optimized.

The first option I tried was using the two optimizer modifiers which reduces the poly count by an overall percentage, calculating how many polygons need to be in one place before removing what they deem unnecessary. however, I found by doing this, it destroys the original topology which is no good, especially since it also ruins the smoothing and how light reacts to the surface of the model in places too.

So instead I selected an edge loop, used a geometry tool called DOT RING which selects every second edge loop and deleted those accordingly.

This the 400~ polygon glass model alongside the attempt made by the optimizer pro modifier:


Session 3 - Unwrapping and texturing
This was the first model to not unwrap in accordance with the normal mapping breaks that usually divides the models into halves I can then relax and export. Instead, I had to select edge loops in the UV Editor and break them manually, separating any circular surfaces first to avoid deformations caused by them. once the breaks had been made and the sides had been flattened, this was the result:
From there, I peeled and relaxed the remaining polys before compiling and rescaling the elements of the unwrap into the map like so:
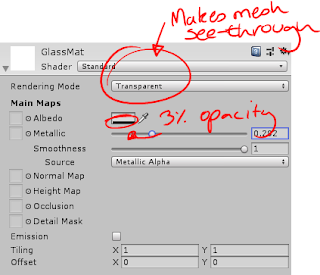
I exported the low poly glass into Unity as an FBX and created a material with hopes that lowering the alpha (opacity or transparency) value on the albedo/diffuse/ color map will make the material see-through. Unfortunately, this wasn't the case and with a quick google search, I found the reason for this was that I was using the wrong renderer (opaque by default):


Session 1 - Modelling
For the process of modeling the glass, I followed this tutorial which teaches all about using splines (bezier curves) and modifiers to create an accurate base without needing to scale, extrude, repeat cylinders whilst getting undesired results from Subdividing.
I continued following the tutorial until he reached a point where he began talking about V- Ray and how he uses that render to get realistic glass which wouldn't have helped to see as I don't have that plugin/extension.
Session 2 - Optimisation
When Finishing the model, I noticed that because the tutorial uses a lot of smoothing iterations, I now had a very high polygon model that wouldn't be suitable for a game simply because it wasn't optimized.

The first option I tried was using the two optimizer modifiers which reduces the poly count by an overall percentage, calculating how many polygons need to be in one place before removing what they deem unnecessary. however, I found by doing this, it destroys the original topology which is no good, especially since it also ruins the smoothing and how light reacts to the surface of the model in places too.
So instead I selected an edge loop, used a geometry tool called DOT RING which selects every second edge loop and deleted those accordingly.

This the 400~ polygon glass model alongside the attempt made by the optimizer pro modifier:

So this is the new low poly version alongside the high poly model I started with:

This was the first model to not unwrap in accordance with the normal mapping breaks that usually divides the models into halves I can then relax and export. Instead, I had to select edge loops in the UV Editor and break them manually, separating any circular surfaces first to avoid deformations caused by them. once the breaks had been made and the sides had been flattened, this was the result:
From there, I peeled and relaxed the remaining polys before compiling and rescaling the elements of the unwrap into the map like so:
I exported the low poly glass into Unity as an FBX and created a material with hopes that lowering the alpha (opacity or transparency) value on the albedo/diffuse/ color map will make the material see-through. Unfortunately, this wasn't the case and with a quick google search, I found the reason for this was that I was using the wrong renderer (opaque by default):

From there, I mess with the Metallic slider to give the glass reflection and the smoothness value to give the glass the smooth, glossy look from the reference. So eventually I went from a model looking like this:
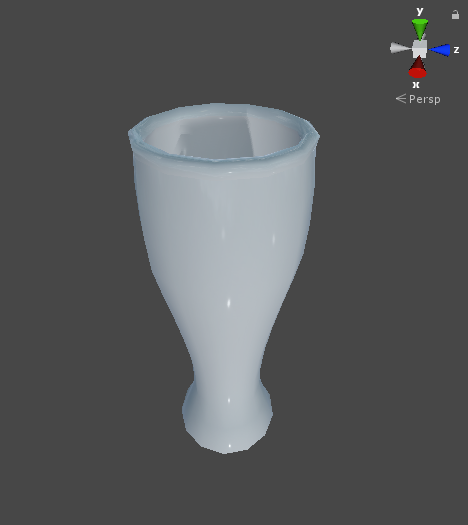
To this:

I used some post processing to get a final render of the glass which looked like this:

Summary
I feel like I learned a lot from using other people's methods that use modifiers to 3d model. While I am rather underwhelmed by the sharp corners caused by the optimization process I discuss from session 2, I must say for a game asset, it looks a lot better than I'd anticipated it would.
Asset Development - Model 2: Glass
 Reviewed by Ben Roughton
on
June 29, 2018
Rating:
Reviewed by Ben Roughton
on
June 29, 2018
Rating:
Reviewed by Ben Roughton
on
June 29, 2018
Rating:
No comments: